
 TRONG CHUYỂN ĐỔI SỐ (DIGITAL TRANSFORMATION)")


 (tiếp theo)")


 in RHEL/CentOS 7.0")


We have already posted guides for installing LAMP and LEMP stacks in Arch Linux. Refer the following links if you haven’t checked them yet.
- Install Apache, MariaDB, PHP (LAMP) stack on Arch Linux
- Install Nginx, MariaDB, PHP (LEMP) stack on Arch Linux
For those who don’t know about LAMP stack, It is a popular, open source web development platform that can be used to run and deploy dynamic websites and web-based applications. Typically, LAMP stack consists of Apache webserver, MariaDB/MySQL databases, PHP/Python/Perl programming languages. LAMP is the acronym of Linux, MariaDB/MYSQL, PHP/Python/Perl.
Today, we will see how to install Apache, MariaDB, PHP (LAMP stack) in Ubuntu 16.04 LTS server.
For the purpose of this tutorial, I will be using the following testbox.
- Operating System : Ubuntu 16.04 64 bit LTS server
- IP address : 192.168.1.102/24
- Hostname : server.sysvn.net
Let us get started. You can either install all modules in the LAMP stack at once, or install each module one by one.
In this tutorial, I am going to install each modules one by one.
1. Install Apache webserver
To install Apache web server, run the following command from the Terminal:
sudo apt-get install apache2

After installing apache, open up your web browser and navigate to http://localhost/ or http://IP-Address/.
If you are see a screen something like below. You are good to go. Apache server is working!

Check the status of Apache service using command:
sudo systemctl status apache2
Sample output:
● apache2.service - LSB: Apache2 web server
 Loaded: loaded (/etc/init.d/apache2; bad; vendor preset: enabled)
 Drop-In: /lib/systemd/system/apache2.service.d
 └─apache2-systemd.conf
 Active: active (running) since Thu 2016-06-02 18:27:15 IST; 11s a
 Docs: man:systemd-sysv-generator(8)
 Process: 11243 ExecStop=/etc/init.d/apache2 stop (code=exited, sta
 Process: 11268 ExecStart=/etc/init.d/apache2 start (code=exited, s
 Tasks: 6 (limit: 512)
 CGroup: /system.slice/apache2.service
 ├─11285 /usr/sbin/apache2 -k start
 ├─11288 /usr/sbin/apache2 -k start
 ├─11289 /usr/sbin/apache2 -k start
 ├─11290 /usr/sbin/apache2 -k start
 ├─11291 /usr/sbin/apache2 -k start
 └─11292 /usr/sbin/apache2 -k start

Jun 02 18:27:13 server systemd[1]: Starting LSB: Apache2 web server.
Jun 02 18:27:13 server apache2[11268]: * Starting Apache httpd web
Jun 02 18:27:15 server apache2[11268]: *
Jun 02 18:27:15 server systemd[1]: Started LSB: Apache2 web server.
lines 1-21

As you see, Apache server is started and working!
2. Install MariaDB
MariaDB is the drop-in replacement of MySQL database server.
To install it, run:
sudo apt-get install mariadb-server mariadb-client
The version of MariaDB in the Ubuntu official repositories might be outdated. If you want to install a latest MariaDB, add the MariaDB official repository and install it as shown below.
First, add MariaDB repository and import the key as shown below.
sudo apt-get install software-properties-common
sudo apt-key adv --recv-keys --keyserver hkp://keyserver.ubuntu.com:80 0xF1656F24C74CD1D8
sudo add-apt-repository 'deb [arch=amd64,i386] http://mirror.fibergrid.in/mariadbrepo/10.1/ubuntu xenial main'
After adding the repository, run the following commands to install MariaDB.
sudo apt-get update
sudo apt-get install mariadb-server
Setup database administrative user (root) password
During MariaDB installation, It will not you to set password for the administrative user account (root).
If you try to setup password manually using command:
mysql_secure_installation
You can’t login set the password. You will see an error like below.
NOTE: RUNNING ALL PARTS OF THIS SCRIPT IS RECOMMENDED FOR ALL MariaDB
 SERVERS IN PRODUCTION USE! PLEASE READ EACH STEP CAREFULLY!

In order to log into MariaDB to secure it, we'll need the current
password for the root user. If you've just installed MariaDB, and
you haven't set the root password yet, the password will be blank,
so you should just press enter here.

Enter current password for root (enter for none):
ERROR 1698 (28000): Access denied for user 'root'@'localhost'
Enter current password for root (enter for none):
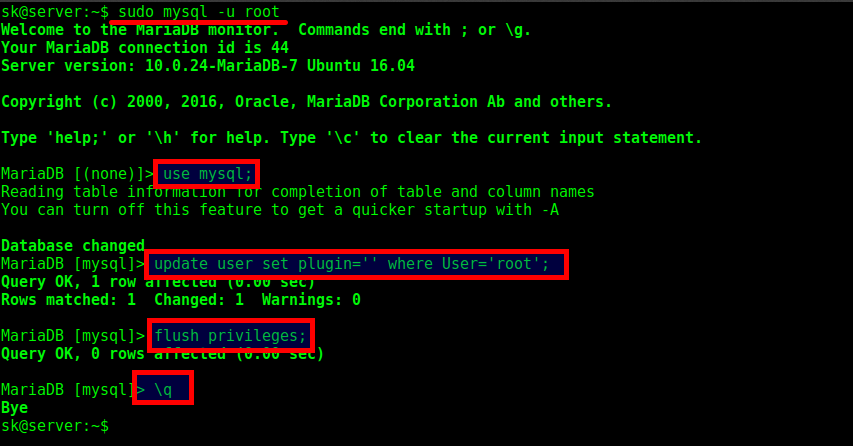
To fix this problem, log in as MySQL database administrator using command:
sudo mysql -u root
After logging into the MySQL prompt, run the following commands one by one.
use mysql;
update user set plugin='' where User='root';
flush privileges;
\q
Now, you can set database administrative password using command:
mysql_secure_installation
Enter password password, and hit ENTER key to accept the default values.
NOTE: RUNNING ALL PARTS OF THIS SCRIPT IS RECOMMENDED FOR ALL MariaDB
 SERVERS IN PRODUCTION USE! PLEASE READ EACH STEP CAREFULLY!

In order to log into MariaDB to secure it, we'll need the current
password for the root user. If you've just installed MariaDB, and
you haven't set the root password yet, the password will be blank,
so you should just press enter here.

Enter current password for root (enter for none): # Press ENTER
OK, successfully used password, moving on...

Setting the root password ensures that nobody can log into the MariaDB
root user without the proper authorisation.

Set root password? [Y/n] # Press ENTER
New password: # Enter password
Re-enter new password: # Re-enter password
Password updated successfully!
Reloading privilege tables..
 ... Success!


By default, a MariaDB installation has an anonymous user, allowing anyone
to log into MariaDB without having to have a user account created for
them. This is intended only for testing, and to make the installation
go a bit smoother. You should remove them before moving into a
production environment.

Remove anonymous users? [Y/n] # Press ENTER
 ... Success!

Normally, root should only be allowed to connect from 'localhost'. This
ensures that someone cannot guess at the root password from the network.

Disallow root login remotely? [Y/n] # Press ENTER
 ... Success!

By default, MariaDB comes with a database named 'test' that anyone can
access. This is also intended only for testing, and should be removed
before moving into a production environment.

Remove test database and access to it? [Y/n] # Press ENTER
 - Dropping test database...
ERROR 1008 (HY000) at line 1: Can't drop database 'test'; database doesn't exist
 ... Failed! Not critical, keep moving...
 - Removing privileges on test database...
 ... Success!

Reloading the privilege tables will ensure that all changes made so far
will take effect immediately.

Reload privilege tables now? [Y/n] # Press ENTER
 ... Success!

Cleaning up...

All done! If you've completed all of the above steps, your MariaDB
installation should now be secure.
That’s it. Password for the database administrative user account has been set.
Verify if MariaDB service is running or not using command:
sudo service mysql status
Sample output:
● mysql.service - LSB: Start and stop the mysql database server daemon
 Loaded: loaded (/etc/init.d/mysql; bad; vendor preset: enabled)
 Active: active (running) since Thu 2016-06-02 17:50:45 IST; 17min ago
 Docs: man:systemd-sysv-generator(8)
 CGroup: /system.slice/mysql.service
 ├─3557 /bin/bash /usr/bin/mysqld_safe
 ├─3558 logger -p daemon err -t /etc/init.d/mysql -i
 ├─3702 /usr/sbin/mysqld --basedir=/usr --datadir=/var/lib/mysql --plugin-dir=/usr/lib/mysql/plugin --user=mysql --skip-log-error --pid-file=
 └─3703 logger -t mysqld -p daemon error

Jun 02 17:50:47 server /etc/mysql/debian-start[3754]: Looking for 'mysqlcheck' as: /usr/bin/mysqlcheck
Jun 02 17:50:47 server /etc/mysql/debian-start[3754]: Phase 1/6: Checking and upgrading mysql database
Jun 02 17:50:47 server /etc/mysql/debian-start[3754]: Processing databases
Jun 02 17:50:47 server /etc/mysql/debian-start[3754]: mysql
Jun 02 17:50:47 server /etc/mysql/debian-start[3754]: mysql.column_stats OK
Jun 02 17:50:47 server /etc/mysql/debian-start[3754]: mysql.columns_priv OK
Jun 02 17:50:47 server /etc/mysql/debian-start[3754]: mysql.db OK
Jun 02 17:50:47 server /etc/mysql/debian-start[3754]: mysql.event OK
Jun 02 17:50:47 server /etc/mysql/debian-start[3804]: Checking for insecure root accounts.
Jun 02 17:50:47 server /etc/mysql/debian-start[3808]: Triggering myisam-recover for all MyISAM tables and aria-recover for all Aria tables

3, Install PHP
To install PHP, run:
sudo apt-get install php libapache2-mod-php php-mcrypt php-mysql

After installing PHP, create info.php file in the Apache root document folder. Usually, apache root document folder will be /var/www/html/ or /var/www/ in most Debian based Linux distributions. In Ubuntu 16.04 LTS, it is /var/www/html/.
Create test.php in the apache root folder as shown below.
sudo nano /var/www/html/info.php
Add the following lines:
<?php
phpinfo();
?>
Save and quit the file. Restart apache service to take effect the changes.
sudo systemctl restart apache2
In Ubuntu 14.10 and older versions, restart apache service as shown below.
sudo service apache2 restart
Now, open up your web browser and type: http://IP-address/info.php in the address bar.
You will be pleased with a screen like below.

Install PHP modules
To improve the functionality of PHP, you can install some additional PHP modules.
To list the available PHP modules, run:
sudo apt-cache search php- | less
Sample output:

Use and arrows to move up and down between the result. To exit from the result, type q.
To find the details of any particular php module, for example php-gd, run:
sudo apt-cache show php-gd

To install a php module run:
sudo apt-get install php-gd

To install all modules (not necessary though), run:
sudo apt-get install php*
Do not forget to restart Apache service after installing any php module.
Congratulations! We have successfully setup LAMP stack in Ubuntu 16.04 LTS server.
Cheers!


")


